Visualizing Tweet Vectors Using Python
7th December 2016I try to experiment with a lot of different technologies. I’ve found that having experience with a diverse set of concepts, languages, libraries, tools etc. leads to more robust thinking when trying to solve a problem. If you don’t know that something exists then you can’t use it when it would be helpful to do so! There are lots of ways to gain these experiences. One can find great content online for almost any topic imaginable. But I’ve found that the best way to understand a technology is to try to build something with it.
My latest target was a basket of different libraries in the Python ecosystem covering things like web development, caching, asynchronous messaging, and visualization. And since I’m a data scientist, I threw in a machine learning component just for fun. To explore these technologies, I created a semi-practical application that reads from the Twitter stream, parses tweets, and does some machine learning magic to score the tweet’s sentiment and project it into a two-dimensional grid, where tweets with similar content will appear closer to each other. It does all of this more or less in real time using asynchronous messaging.
The remainder of this blog post is devoted to showing how to build this from scratch. Just to be completely transparent about what it does and what technologies are involved, here are the components that I’ll demonstrate how to build:
- Basic web development in Python using Flask + standard front-end stuff (Bootstrap, JQuery etc.)
- Asynchronous, chainable task queues using Celery and Redis
- Real-time event-based communication between Flask and connected clients using Socket-IO
- Twitter stream filtering/parsing using Pattern
- Streaming real-time visualization using NVD3
- Sentiment analysis and word embeddings using Scikit-learn and Gensim (word2vec)
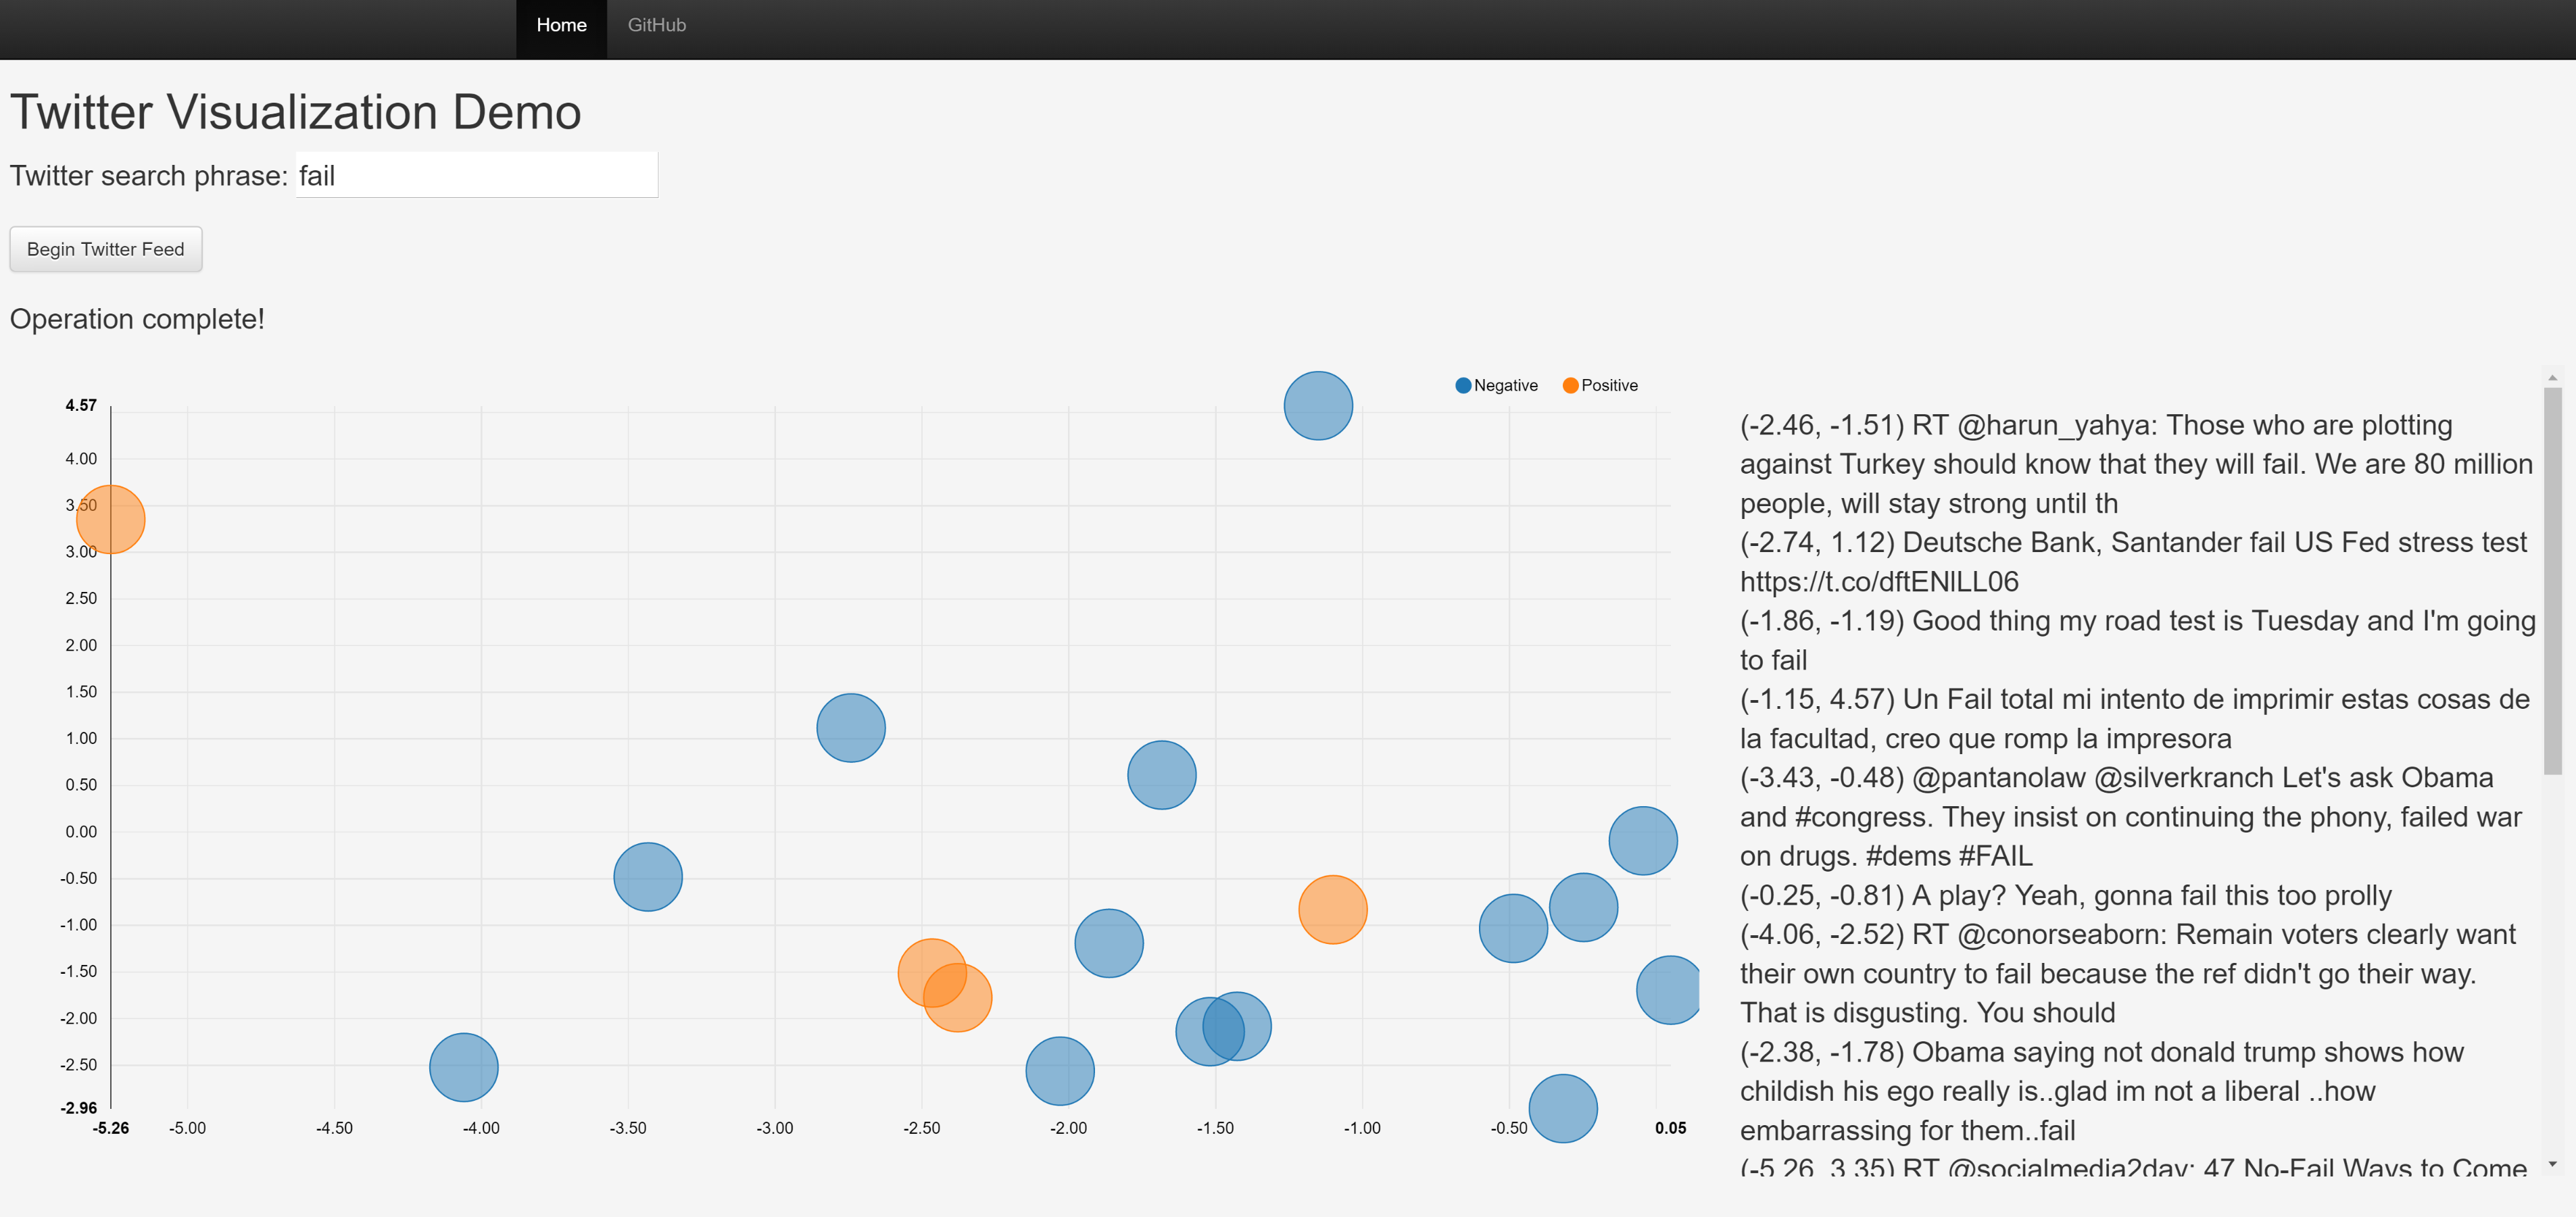
And here's a screenshot of what the finished app looks like.
Why are we doing this? Does this app have some tangible, real-world purpose? Probably not. But it’s fun and neat and you’ll hopefully learn a lot. If that sounds interesting then read on!
(NOTE: The completed application is located here. Feel free to reference this often as I may leave out some details throughout the post).
Setup
To get started, let’s talk about the setup required to run the application. In addition to a working Python interpreter, you’ll need to install a bunch of libraries that the application uses. You’ll also need to know how to perform a few tasks such as starting Redis, launching Celery, and running a Flask server. Fortunately these are all very easy to do. I wrote up detailed instructions in the project’s README file. Follow those steps and you should be up and running.
Sentiment & Word Vector Models
Now let’s build sentiment and word vector models to transform tweets. We’ll use this Twitter sentiment dataset as training data for both models. The first step is to read in the dataset and do some pre-processing using TF-IDF to convert each tweet to a bag-of-words representation.
print('Reading in data file...')
data = pd.read_csv(path + 'Sentiment Analysis Dataset.csv',
				   usecols=['Sentiment', 'SentimentText'], error_bad_lines=False)
print('Pre-processing tweet text...')
corpus = data['SentimentText']
vectorizer = TfidfVectorizer(decode_error='replace', strip_accents='unicode',
							 stop_words='english', tokenizer=tokenize)
X = vectorizer.fit_transform(corpus.values)
y = data['Sentiment'].values
Note that we’re using a custom tokenizer designed to handle patterns common in tweets. I borrowed this from a script Christopher Potts wrote and adapted it slightly (final version is in the "scripts" folder). Next, we can train the sentiment classifier and word2vec model.
print('Training sentiment classification model...')
classifier = MultinomialNB()
classifier.fit(X, y)
print('Training word2vec model...')
corpus = corpus.map(lambda x: tokenize(x))
word2vec = Word2Vec(corpus.tolist(), size=100, window=4, min_count=10, workers=4)
word2vec.init_sims(replace=True)
This should run pretty fast since the training data set is not that big. We now have a model that can read a tweet and classify its sentiment as either positive or negative, and another model that transforms the words in a tweet to 100-dimensional vectors. But we still need a way to use those 100-dimensional vectors to spatially plot a tweet on a 2-dimensional grid. To do that, we’re going to fit a PCA transform for the word vectors and keep only the first 2 principal components.
print('Fitting PCA transform...')
word_vectors = [word2vec[word] for word in word2vec.vocab]
pca = PCA(n_components=2)
pca.fit(word_vectors)
Finally, we’re going to save all of these artifacts to disk so we can call them later from the web application.
print('Saving artifacts to disk...')
joblib.dump(vectorizer, path + 'vectorizer.pkl')
joblib.dump(classifier, path + 'classifier.pkl')
joblib.dump(pca, path + 'pca.pkl')
word2vec.save(path + 'word2vec.pkl')
Web App Initialization
Now that we have all the models we need ready to go, we can get started on the meat of the application. First, some initialization. This code runs only once, when the Flask server is launched.
# Initialize and configure Flask
app = Flask(__name__)
app.config['SECRET_KEY'] = 'secret'
app.config['CELERY_BROKER_URL'] = 'redis://localhost:6379/0'
app.config['CELERY_RESULT_BACKEND'] = 'redis://localhost:6379/0'
app.config['SOCKETIO_REDIS_URL'] = 'redis://localhost:6379/0'
app.config['BROKER_TRANSPORT'] = 'redis'
app.config['CELERY_ACCEPT_CONTENT'] = ['pickle']
# Initialize SocketIO
socketio = SocketIO(app, message_queue=app.config['SOCKETIO_REDIS_URL'])
# Initialize and configure Celery
celery = Celery(app.name, broker=app.config['CELERY_BROKER_URL'])
celery.conf.update(app.config)
There’s a bunch of stuff going on here so let’s break it down. We’ve created a variable called "app" that’s an instantiation of Flask, and set some configuration items to do things like tell it to use Redis as the broker (note that "config" is just a dictionary of key/value pairs which we can use for other settings not required by Flask). We also created a SocketIO instance, which is a class from the Flask-SocketIO integration library that basically wraps Flask with SocketIO support. Finally, we created our Celery app and updated its configuration settings to use the "config" dictionary we defined for Flask.
Next we need to load the models we created earlier into memory so they can be used by the application.
# Load transforms and models
vectorizer = joblib.load(path + 'vectorizer.pkl')
classifier = joblib.load(path + 'classifier.pkl')
pca = joblib.load(path + 'pca.pkl')
word2vec = Word2Vec.load(path + 'word2vec.pkl')
Finally, we’ll create some helper functions that use these models to classify the sentiment of a tweet and transform a tweet into 2D coordinates.
def classify_tweet(tweet):
    """
    Classify a tweet with either a positive (1) or negative (0) sentiment.
    """
    pred = classifier.predict(vectorizer.transform(np.array([tweet.text])))
    return str(pred[0])
def vectorize_tweet(tweet):
    """
    Convert a tweet to vector space using a pre-trained word2vec model, then transform
    a sum of the vectorized words to 2-dimensional space using PCA to give a simple
    2D coordinate representation of the original tweet.
    """
    tweet_vector = np.zeros(100)
    for word in tokenize(tweet.text):
        if word in word2vec.vocab:
            tweet_vector = tweet_vector + word2vec[word]
    components = pca.transform(tweet_vector)
    x = components[0, 0]
    y = components[0, 1]
    return str(x), str(y)
Flask Routes
The server code handling web requests is very simple, in fact there are only two routes. The first one is the root path and just returns the main page ("index.html").
@app.route('/', methods=['GET'])
def index():
    """
    Route that maps to the main index page.
    """
    return render_template('index.html')
The second route accepts an input phrase and initiates a task chain that will kick off a stream of tweets from the Twitter firehose that match the input phrase.
@app.route('/twitter/<phrase>', methods=['POST'])
def twitter(phrase):
    """
    Route that accepts a twitter search phrase and queues a task to initiate
    a connection to twitter.
    """
    queue = app.config['SOCKETIO_REDIS_URL']
    # create_stream.apply_async(args=[phrase, queue])
    chain(create_stream.s(phrase, queue), send_complete_message.s()).apply_async()
    return 'Establishing connection...'
This is probably confusing at first glance so let’s examine a bit closer. The "queue" variable is just a string pointing to the URL where Redis is running ("redis://localhost:6379/0"), which we’ll use later. The "chain" line is a Celery function that composes a sequence of tasks to be queued up and run asynchronously. In this case, we’re queuing a call to the "create_stream" task following by a call to the "send_complete_message" task. These tasks may or may not begin executing immediately (depending on the state of the task queue) but in any event, execution of the function continues on to the last line where we return a message to the client saying that a connection (to Twitter) is being established.
Task Queues
In the last section we queued calls to two functions, "create_stream" and "send_complete_message". We said that these were defined as tasks in Celery, meaning that they execute asynchronously apart from the main program thread. Let’s take a look at those functions.
@celery.task
def create_stream(phrase, queue):
    """
    Celery task that connects to the twitter stream and runs a loop, periodically
    emitting tweet information to all connected clients.
    """
    local = SocketIO(message_queue=queue)
    stream = Twitter().stream(phrase, timeout=30)
    for i in range(60):
        stream.update()
        for tweet in reversed(stream):
            sentiment = classify_tweet(tweet)
            x, y = vectorize_tweet(tweet)
            local.emit('tweet', {'id': str(i),
                                 'text': str(tweet.text.encode('ascii', 'ignore')),
                                 'sentiment': sentiment,
                                 'x': x,
                                 'y': y})
        stream.clear()
        time.sleep(1)
    return queue
There’s a lot to digest here so let’s step through it. First, "local" is a Socket-IO instance. Recall that we’re using Socket-IO (through the Flask-SocketIO wrapper library) to essentially "push" information from the Flask server to all connected clients, so this object is creating a channel that will allow us to do that. The reason we’re creating a local instance within the function and not using the global instance is because our Celery task runs in a separate thread (remember, this function gets called asynchronously).
In the next line, we create an object that we imported from the Pattern library that creates a persistent connection with Twitter. Notice we pass in the search phrase that we got via client input. This will restrict the Twitter stream to only capture tweets with that phrase in it. The next section enters a 60-second loop where each second we check for new tweets, and if any are found, we run our sentiment and vectorization functions on them. The last step is the "emit" line, where we tell Socket-IO to push out a message with all of our data for that tweet.
At the very end of the function’s execution, it returns the "queue" variable. You may be wondering – what is this for? Where does it go? Remember that we chained multiple Celery tasks together. When "create_stream" finishes executing the next task in the chain ("send_complete_message") is called, with the output of the first task passed to the next task. In this case we’re using the chain to propagate information (the URL of the Redis queue) through to each task.
The "send_complete_message" function is much simpler and shouldn’t require much explanation. Essentially what we’re doing is emitting a message to our clients that the loop in the previous function finished executing.
@celery.task
def send_complete_message(queue):
    """
    Celery task that notifies the client that the twitter loop has completed executing.
    """
    local = SocketIO(message_queue=queue)
    local.emit('complete', {'data': 'Operation complete!'})
As a practical matter, it wasn’t necessary to set things up this way. We could have very easily just stuck this at the end of the "create_stream" function. But I wanted to demonstrate a simple example of how to compose workflows in Celery and pass information between tasks. The whole point is to learn about these libraries and what they can do!
Front End
All we have left is to create a UI for the user to interact with and wire up some javascript to communicate through Socket-IO and handle the events pushed from the server. The UI code is pretty generic so I won’t cover it in this post but feel free to inspect index.html in the repo to see it all put together. I’ll say a few things about the javascript code though. First we need a function that takes a user-provided phrase and posts it to the web server, which initiates the whole process. This is pretty standard JQuery stuff.
function twitter() {
	phrase = $('#phrase').val();
	url = encodeURI('/twitter/' + phrase);
	$.ajax({
		type: 'POST',
		url: url,
		success: function(data, status, request) {
			$('#twitter-status').html(data);
		},
		error: function() {
			alert('An error occurred submitting the request.');
		}
	});
}
We also need a function to create the chart what we’ll use to display tweets. I pulled some examples from the NVD3 website and came up with the following, which renders a scatter plot using the “data” variable as input (this gets populated later).
function loadGraph() {
	var chart = nv.models.scatterChart()
		.pointRange([2000, 2000])
		.color(d3.scale.category10().range());
	chart.xAxis.tickFormat(d3.format('.02f'));
	chart.yAxis.tickFormat(d3.format('.02f'));
	d3.select('#chart svg')
		.datum(data)
		.transition()
		.duration(500)
		.call(chart);
	nv.utils.windowResize(chart.update);
	return chart;
}
Additionally there’s a few things going on in the main script body, which runs a single time when the page is first loaded. First, we open a socket to establish a persistent connection with the server.
var socket = io.connect('http://' + document.domain + ':' + location.port);
Next we need to create an event handler that responds to a "tweet" message from the server. The event handler does a few things:
- Update some labels with a new status
- Add a new JSON record to the data structure used by the graph
- Redraw the graph to display the new data
- Append the raw text from the tweet to a display panel
socket.on('tweet', function(msg) {
	$('#phrase').val('');
	$('#twitter-status').html(
		'Connection established. Streaming for 60 seconds (currently at ' + msg.id + ')...');
	sentiment = parseInt(msg.sentiment);
	x = parseFloat(msg.x);
	y = parseFloat(msg.y);
	data[sentiment].values.push({
		id: msg.id,
		x: x,
		y: y,
		size: 2000,
		shape: "circle"});
	loadGraph();
	$('#twitter-results').append(
		'<br>' + $('<div/>').text('(' + x.toFixed(2) + ', ' + y.toFixed(2) + ') ' + msg.text).html());
});
We also need an event handler that responds to the "complete" message.
socket.on('complete', function(msg) {
	$('#twitter-status').html(msg.data);
});
The last step is just to wire up the beginning click event and initiate the graph.
$('#begin').click(twitter);
nv.addGraph(loadGraph);
Putting It All Together
That’s essentially it. If you want to run it yourself, the easiest way would be to download the source code here and follow the instructions in README.md. If all goes well, you should see something like this.
There are a fair amount of details that I glossed over in the interest of not making this post too long, but if you’d like to learn more about any of the libraries I used I’d highly encourage spinning through the documentation for that library. Pretty much all of them are well-documented with lots of example code, which is how I learned a lot of what I needed to know to make this app.
That wraps up the walk-through. As I said at the top, experimenting with new technologies is a great way to learn. By combining several new technologies at once, it forces even greater comprehension. This app is pretty bare-bones and not all that useful in its current state beyond serving as a learning tool, but there are a million ways it could be extended. If you find this stuff interesting, feel free to fork the repo and make your own version!